Implementing Google Analytics v4 or Google Tag Manager on your websites helps collect important visitor information. However, having these scripts makes it difficult to achieve a perfect core web vitals score for your WordPress websites.
When combined with Facebook pixel, other third-party scripts, and heat map scripts, passing CWV becomes nearly impossible.
Unfortunately, removing these scripts is not an option, as data is essential for measuring your efforts accurately.
What if you could gather essential visitor information, track campaigns, and measure efforts while maintaining good speed and achieving excellent core web vitals?
Introducing Cloudflare Zaraz.
Cloudflare Zaraz controls third-party tools and scripts, including analytics tools, advertising pixels, chatbots, and marketing automation tools. It allows offloading these tools and services to the Cloudflare server-side edge, improving website page speed and security.
Built for speed, privacy, and security, Cloudflare Zaraz allows you to load numerous tools with a near-zero performance impact. For example, you can install Google Tag Manager, Google Analytics, and Facebook Pixels on your website without concern about speed issues and CWV.
Some of the notable Cloudflare’s Zaraz features are,
- Third-party integrations: With Zaraz, you can easily add multiple third-party tools and offload them from your website.
- Web API: Zaraz offers a client-side web API that can be utilized within a page’s tag.
- Consent Management: Zaraz offers a Consent Management platform to assist you in addressing and managing necessary consent.
- Improve developer experience: Easily integrate numerous third-party tools via the Zaraz dashboard with minimal code adjustments. Use a single API to track engagement and transmit data to all the integrated third-party tools.
- Improve SEO ranking and user experience: Optimize your website for Google’s Core Web Vitals to improve SEO rankings and deliver an excellent user experience.
In this article, I will show you how to set up Cloudflare Zaraz with Google Analytics v4 and exclude your visits from appearing in your analytics report.
Before proceeding with this tutorial, please ensure that you have a GA4 measuring ID and that your WordPress website is proxied by Cloudflare. If you’re not using Cloudflare or only using their DNS service, you can still use the subdomain method. For more information, refer to the Zaraz Docs.
You can also use Google Tag Gateway to serve Google metrics scripts as first-party data from your domain.
If you prefer not to use Cloudflare, you can locally host external scripts using Perfmatters or WP Rocket.
Set Up Google Analytics v4 in Cloudflare Zaraz for Optimal Performance
To configure GA4 with Zaraz, follow these steps.
Step 1: Log in to the Cloudflare Dashboard and select the desired domain you want to track.

Step 2: Navigate to DNS > Records in the left-hand panel and click on it.

Step 3: Ensure your domain is proxied by Cloudflare by checking for an orange cloud next to the domain name.
Step 4: Click on Zaraz>Tools.

Step 5: Click “Add New Tool” under the Third-Party Tools section.
Step 6: Now you can either search for “All tools” or directly navigate to the Analytics tab within “All tools” and select “Google Analytics 4.”

Step 7: In the “Set Up Google Analytics” popup, click “Continue” to configure Google Analytics 4.

Step 8: Click “Continue” to grant Zaraz the required permissions.

Step 9: Once you have entered the necessary details, click the “Save” button.
- Step 9: A: You can modify the tool name from here.
- Step 9: B: Enter your “Measurement ID” here, which generally appears as “G-XXXXXXXXXX“.
- Step 9: C: You can hide your visitor’s originating IP address from here.
- Step 9: D: Enable these options if you have an e-commerce store or want to collect audience data using GA4. For this tutorial, leave them unchanged.

Step 10: The “Pageview” tracking action is present. You must first create a new trigger by default to create a new action.

Confirm Cloudflare Zaraz is Active on Your Website
Step 11:
Step 11: A: For Firefox: Open your website in incognito mode, access the Inspect panel (you can use Ctrl+Shift+I), navigate to the network terminal, click on the first resource URL, and then on the right-hand side, select the Cookies tab.
Step 11: B: In Firefox, check if “cf_zaraz_google-analytics_v4” is present. If not, please review your setup.
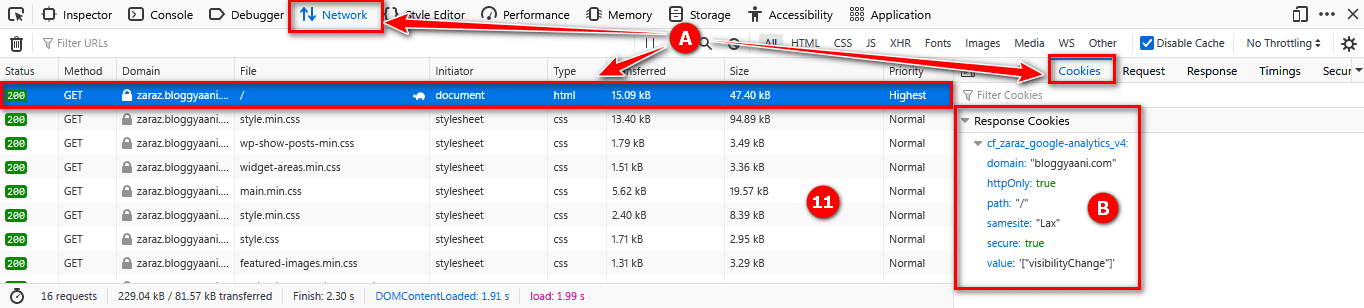
Step 11: C: For Chrome: Open your website in incognito mode, click on the lock icon in the address bar, and then click the Cookies link. This will open a new popup where you can confirm the presence of “cf_zaraz_google-analytics_v4“.

Important: In this tutorial, I am using a dedicated subdomain. However, you can still observe cookies associated with the root domain. This is because Cloudflare considers the root domain the main domain in Zaraz. I recommend using your main domain directly for better results.
Step 12: Verify real-time visitor details by checking the GA4 Real-Time dashboard page.

Exclude WP Admins from Cloudflare Zaraz – Keep Reports Clean
Enabling Zaraz on your website activates it across the entire site, including activities on “wp-admin” pages and sending them to GA4.
To ensure these pages are not shown in your reports, you must exclude the “wp-admin” directory pages and “wp-login.php“.
Step 13: In your Cloudflare domain dashboard, navigate to Rules > Configuration Rules and click the “Create rule” button.

Step 14: Once you have made the necessary changes to the settings, click the “Deploy” button.
- Step 14: A: Provide a descriptive name for the rule.
- Step 14: B: Select a custom filter expression to apply the rule only to your desired locations.
- Step 14: C: Add these two rules to disable Zaraz.
- URI > Contains > wp-login.php
- Or
- URI Path > Contains > wp-admin
- Step 14: D: Alternatively, you can edit the expression here. If you prefer this method, paste the provided expression inside the expression block.
- (http.request.uri contains “wp-login.php”) or (http.request.uri.path contains “wp-admin”)
- Step 14: E: Click the “+ Add” button to disable Zaraz.

The “wp-admin” directory and “wp-login.php” are now excluded from Zaraz. You can verify this within the GA4 dashboard.
Important: The method described above stops Zaraz from measuring the wp-admin directory and wp-login.php page data, but it continues to measure your website pages when logged in as an administrator. To solve this problem, follow the steps below.
Step 15: To prevent Zaraz from measuring the pageview of your website while the administrator is logged in, add the following code to your theme’s function.php file. Or, you can use the free Code Snippets plugin for this purpose.
// Add Admin Cookie
add_action( 'wp_login', 'bg_add_custom_cookie' );
function bg_add_custom_cookie() {
    setcookie( 'bg_cookie', 'cflogged', time()+86400 );
}
The above code adds the bg_cookie”cflogged” cookie on every page while you are logged in. Ensure this cookie is on the verification page, as mentioned in Step 11.
// Remove Admin Cookie
add_action( 'wp_logout', 'bg_remove_custom_cookie' );
function bg_remove_custom_cookie() {
    setcookie( 'bg_cookie', '', -1000000 );
}
The above code removes the bg_cookie “cflogged” cookie when you log out from WordPress.
Step 16: Edit the previously created configuration rule and save the changes.
- Step 16: A: Add one extra rule in Step 14: C,
- URI > Contains > wp-login.php
- Or
- URI Path > Contains > wp-admin
- Or
- Cookie > Contains > bg_cookie=cflogged
- Step 16: B: Or, change expression in Step 14: D,
- (http.request.uri contains “wp-login.php”) or (http.request.uri.path contains “wp-admin”) or (http.cookie contains “bg_cookie=cflogged”)

If you are logged in to your website, Cloudflare Zaraz will no longer track your activities.
Track New Website Actions with Cloudflare Zaraz
In Step 10, Zaraz captures “Pageview” by default. To capture other metrics, you need to create a new action. To create a new action, you must first create a new trigger.
Step 17: Navigate to the Step 10 screen, access the Triggers tab, and click the “Create trigger” button.

Step 18: Fill in the required information and save your changes.
- Step 18: A: Add trigger name.
- Step 18: B: I have chosen the Scroll Depth rule type from the available six rule types for this tutorial.
- Step 18: C: The contents of Box C will change depending on your selection in Box B. For the Scroll Depth rule type, you must specify positions (e.g., 100px, 50%, 100%).

Step 19: Return to the Step 10 screen and click the “Create Action” button.

Step 20: Fill in the required details and click on Save.
- Step 20: A: Add an action name.
- Step 20: B: Add the previously created firing trigger(Step 18) to the configuration.
- Step 20: C: Select the desired action type, such as “Page View.”

The above action trigger is triggered when a visitor views more than 50% of the page content. You can test it by opening your website in incognito mode and scrolling over 50% of the page.
To check inside GA4, follow the below steps.
Step 21: Find the “Event count by Event name” card on the real-time dashboard page.
- Step 21: A: Click “page_view” because it was selected in Step 20: C.
- Step 21: B: Find and click “scrollDepth” because it was selected in Step 18: C.
- Step 21: C: You will find the Event parameter value and the Event count, which was selected in Step 18: C.

Congratulations! You have successfully configured Google Analytics 4 with Cloudflare Zaraz.
☑️: Learn advanced techniques to speed up your WordPress websites like a pro.
Zaraz GA4 vs. Locally Hosted GA4: A Speed Comparison
Why choose Zaraz GA4 over locally hosted GA4?
- Zaraz offers superior detection as it operates on the DNS level, ensuring faster and more secure performance than server-level solutions.
- With a single Zaraz script, you can efficiently monitor website visits, social media performance, and ad performance without compromising website speed.
You can use WP Rocket for locally hosting GA4. Check out for more details on caching and self-hosting GA4 using WP Rocket.
Cloudflare Zaraz GA4 GTmetrix results:

Cloudflare Zaraz adds 3.96 kB, resulting in a compressed website weight of 110 kB.
Locally Hosted GA4 GTmetrix results:
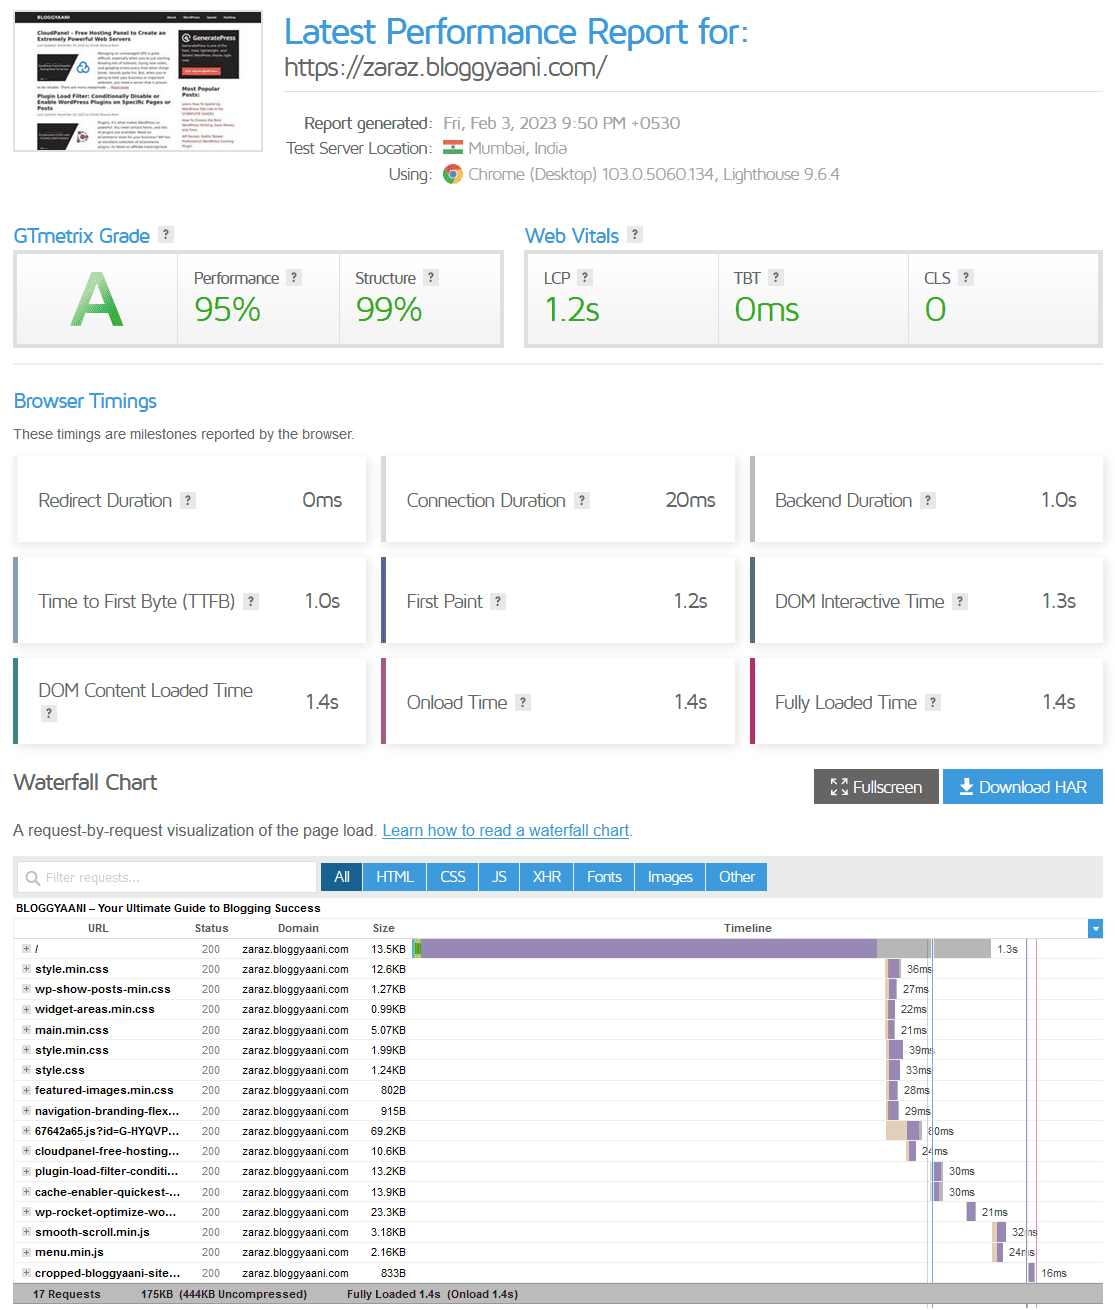
Locally hosted GA4 adds 69.2 kB, resulting in a compressed website weight of 175 kB.
Summary: Cloudflare Zaraz’s Power
Cloudflare Zaraz is a powerful tool that offloads third-party scripts to serverless infrastructure from your website while keeping the important metrics. It helps accelerate your WooCommerce store within seconds.
With GA4 enabled, the Zaraz script weighs just 3.96 kB gzipped or 6.30 kB uncompressed. This optimization ensures your webpage remains lightweight and achieves all green Core Web Vitals (CWV) scores.
Or, you can self-host GA4 using Perfmatters or WP Rocket.
If you have any questions about this tutorial, please don’t hesitate to ask in the comments section below.

Johnny
Thanks, man! I love the cookie to prevent tracking of admin users. It came in very handy! That is a very good post 🙂
Padmaja
Thank your for sharing the information.
I am currently looking for setting the cookie consent in zaraz. can you please some info for zaraz consent. This is will help me to grab the things. waiting for your reply.!!..
Shaikh Masood Alam
Check https://blog.cloudflare.com/consent-manager/ for more details.
Arnold
Thanks for sharing.
May I ask that if I hope to use umami as an alternative of GA4, which one I should choose in Cloudflare Zaraz? It has a Custom Managed Component. I know umami has a small size, but some browsers block it.
Shaikh Masood Alam
I think you can use that, but please be aware that some Google extensions, like uBlock Origin, may block the Zaraz script.
Brad
Metrics such as session start, first user, session count, etc are all calculated in the users browser so I don’t see how Zaraz can be compatible with collecting these metrics. Can you help me understand?
Shaikh Masood Alam
Zaraz can track browser-based metrics like session start, first user, and session count by using its Web API to trigger events.
To implement:
1. Detect Events Client-Side: Use JavaScript in the browser to detect events, such as when a session starts.
2. Send Events to Zaraz: Use
zaraz.track("event_name", {data})to send the event to Zaraz. For example, to track a session start, callzaraz.track("session_start").”Check https://developers.cloudflare.com/zaraz/web-api/track/ and https://developers.cloudflare.com/zaraz/web-api/
Sahil Akhtar Khan
Hi Masood
Can you please explain, why it is necessary to have Cloudfare hosting services? What if we already have another hosting service not cloudfare anymore? How can we integrate zaraz in that case? Please explain more thoroughly.
Shaikh Masood Alam
For using CF Zararz, you need to use Cloudflare DNS and CDN hosting, if your main domain is not proxied by Cloudflare and as per your case, it’s not hosted by Cloudflare DNS service, You can use a subdomain proxied by Cloudflare. Check this article for more information -> https://developers.cloudflare.com/zaraz/advanced/domains-not-proxied/ and this -> https://developers.cloudflare.com/zaraz/advanced/load-zaraz-manually/
Mingyue
Thank you very much, I just found out that this is how CloudFlare’s zaraz is used! Thanks again!
Manuel
I have a question. Do you have to remove ga4 script on my website when Cloudflare Zaraz is setup?
Thanks!
Shaikh Masood Alam
You don’t need a GA4 script on your website while using Cloudflare Zaraz. After successfully integrating Zaraz with GA4, you can remove GA4 from your website.
Manuel
First of all, thank you very much for replying so quickly. I have other questions: Does anything happen if I leave the GA4 script on? Would it duplicate the data? Since I have integrated Cloudflare Zaraz into my website, I have noticed a significant increase in web traffic. I am aware that the GA4 script does not capture all the data on page views and sessions, but I am not sure to what extent it may be duplicating data.
Thanks!!!
Shaikh Masood Alam
When using Cloudflare Zaraz, the Zaarz script comes from your domain, which means less blocking. You should use only one solution (either Zaraz or GA4 script) on your website to avoid any possible duplication problem.