Is your WordPress website taking too long to load? If it is, you need to do something about it.
Speeding up your site’s loading time by shaving off a few milliseconds can significantly boost your traffic and improve your visibility on search engines.
So, what makes WordPress slow down?
While WordPress is great for clean and well-designed code, it’s imperfect. There’s a huge selection of themes and plugins, but not all deliver good performance.
Slow themes and plugins can drag down the speed of your WP site. Combine that with a lousy web host, and you have a serious problem.
If you’ve been wondering, “Why is my WordPress site loading so slowly?” or “How can I make my WordPress load faster?” this guide is for you.
This article explains the simplest ways to speed up your WordPress site. After you’ve read it, if you still have questions about web performance, drop them in the comments section.
Why Is WordPress Site Speed Important?
The main question is, Why Speed is Important for Your WordPress Site in Today’s Digital World?
Thanks to technological advancements, everyone has access to faster internet speed. And people don’t have the patience they used to. If they wait long for your page to load, they will likely hit the back button and pick the next search engine result.
Google now considers site speed a deciding factor in your search result ranking. If your site is slow, get ready to lose many visitors.
A 1-second delay in page response can result in a 7% reduction in conversions.
Source
And, If your website doesn’t load in three seconds, you will lose 40% of your traffic.
How to Test the Loading Time of Your Website?
⚠️: Before making any changes to your WordPress website, it’s essential to check its speed and load time using tools or websites designed for this purpose. Doing this helps establish a starting point for improving your website’s speed.
You should use Google’s page speed or Chrome Lighthouse to test your speed locally. You can also use GTmetrix for benchmarking purposes.
I preferred GTmetrix. It’s helped me to perform tests near real users’ locations. GTmetrix also uses Google page speed metrics recommendations with their enhancement.
Google Lighthouse perform a test on your device, helping to understand how a website works in actual networking condition.
Note: Pick one tool from the above list and stick with it. All tools measure website speed differently from the other tool. Also, run your tests three to four times due to caching, CDN, or third-party script conflicts.
Question: After you run your website speed test, you might be wondering what’s a good website speed that I should aim for?
Answer: Aim for something other than a perfect 100 on core web vitals from the start. That should be sufficient if your website scores 90+ and loads faster than expected for your target demographic.
Question: What Is “Load Time,” Anyway?
Answer: Website load time is the duration it takes for a website or web page to fully appear on screen, including text, images, and videos. It represents the speed at which content loads on a web page.
How to Speed Up Your WordPress Site?
This post covers and contains all tips and tricks, step by step guide on how I configured my WP sites to maximum speed. This recommendation lets you boost WordPress performance and speed and admin dashboard area quickly.
Important: I assume you’ve already set up your WP site and looking for help in the speed optimization process. Don’t worry; I recommend reading the post in reverse order if you still need to start.
✅: I guarantee these tips on WordPress speed optimization & performance will help you to make your site load quickly.
⚠️: Please take a full site backup before starting optimization work. I am not responsible for any data loss while following the below tips.
Image Optimization

Images are one of the most essential parts of any website. They are heavy in size, especially if they are high resolution, but they help your visitors to get engaged with your page more easily.
From a performance perspective, if too many images or unoptimized images load at once on a slow connection, it will increase the loading time of your page and put some visitors off.
For this, I have some easy solutions for you.
Image compression
When you’re on a budget for a shared hosting plan, uploading high-resolution images makes your websites slower to load. Many budget hosting provides you small storage area, which is quickly filled up by your high-resolution photos.
That’s why you must compress your images before displaying them to visitors.
Compression is the easiest way to make images smaller without noticeable quality degradation.
☑️: I prefer the ShortPixel image optimizer with a lossy compression setting. It helps me optimize images for small file sizes, which happens automatically. All I need to do is add an image to the post, and ShortPixel does its magic.
Don’t want to use ShortPixel? You can use Imagify by the WP Rocket team.
I test both plugins on my website, which compress the 7 Mb image folder into 3.5 Mb. Imagify is perfect for JPG, while ShortPixel is great for PNG. Both plugins offer a free tier, sufficient for most use cases.
Install one of the above plugins and start compressing your image without leaving your post editor.
WebP or Avif?
You can also use newer image formats like WebP or Avif.
WebP is developed and pushed by Google to keep image sizes smaller than PNGs or JPGs. All modern browsers support WebP. Using this will fix the Serve images in next-gen formats warning.

The AV1 image file format (AVIF) is an open-source image format and was released in February 2019 by the Alliance for Open Media (AOMedia). Avif is still not supported by some modern browsers.
I use both formats on my websites. You can use ShortPixel to automatically convert your images to WebP or Avif formats.
Here is quick compression for you. Source and compressed files are available,
| File Type | Original Image | Compressed | WebP | Avif |
| PNG[Link] | 43 KB | 8.96 KB | 7.26 KB | 8.96 KB |
| JPG[Link] | 2.04 MB | 284 KB | 244 KB | 210 KB |
⚠️: When using ShortPixel, you must exclude the thumbnail sizes you don’t use on your site from plugin settings. This will save your credit.
What about GIFs?
GIF, short for Graphics Interchange Format, was created as a lightweight and animated image format that could be effortlessly shared across the internet. GIFs can slow down websites due to their larger file size, causing slower load times, particularly on mobile devices.
Using too many GIFs on a page can also result in more server requests, further slowing down the website.
MP4 has replaced GIF as a better option for short animations. MP4 files are smaller, load faster, and consume less bandwidth. They offer higher image quality and smoother animations due to support for a higher frame rate.
Here is quick compression for you. Source and compressed files are available,
| File Type[Link] | Size |
| Gif | 2.64 MB |
| Mp4 | 153 KB |
Lazy load images
Lazy Load helps you to save bandwidth and speed up WordPress sites.
How its work?
Think about writing a super detailed guide with lots of images; by default, the browser load all photos when someone visits that page; it takes time to load all images and makes your website unresponsive, especially on mobile.
If the lazy load is enabled, its only displays images, videos, or iframes to a visitor when it’s visible. With the help of a lazyload, you can reduce HTTP requests to your server; you can save your resources by not showing images to a visitor who has not read your article or has not scrolled down. In most cases helps you to save 50% to 30% of image requests to your server.
From version 5.5+, WordPress enabled native lazy loading functionality for images; still, you can use Perfmatters, WP Rocket, Rocket Lazy Load, or Flying Images to add lazy loading functionality to your blogs.
Perfmatters also supports the lazy loading of inline and CSS background images.
Image width and height
Want to improve your CLS and reduce your layout shifts? Confirm all of your images have width and height attribute sets. You will see “Image elements do not have explicit width and height” warnings if missing.

Well-coded themes like BricksBuilder or GeneratePress automatically add these attributes for you. If it needs to be added to your theme of choice, I suggest you consult your developer. Or, use Perfmatters to add missing width and height attributes automatically.
Properly size images
This is the most common warning when someone migrates to a new theme. If your image size is bigger than its new theme image container size, a “Properly size image” warning will trigger.

You quickly fix this warning with Regenerate Thumbnails plugin. Also, you can force smaller images on smaller screens.
With Disable Generate Thumbnail, You can also stop themes or plugins from generating unnecessary image sizes.
Preload critical images
Preloading critical images (above-the-fold images) helps you to decrease Largest Contentful Paint (LCP) time in Core Web Vital. Logo, feature image on a blog post, and hero image on the landing or home page are counted as critical images.
By preloading them, you’re moving them to the top of the waterfall and prioritizing them to load first.
You can preload your Largest Contentful Paint images manually or automatically using Perfmatters. Or you can preload featured images of your posts and pages using below code snippet.
// Preload Featured Image
add_action( 'wp_head', function(){
$featured_img_url = get_the_post_thumbnail_url(get_the_ID(),'full');
echo '<link rel="preload" as="image" href="'.$featured_img_url.'"/>';
}, 1);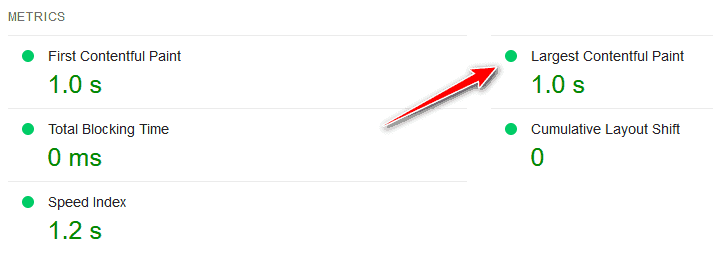
Disable hotlinking of images
You can skip this step if you’re not concerned about bandwidth usage. However, if you’re on a tight bandwidth budget, I suggest using Cloudflare CDN for your website, as it provides unlimited bandwidth improve your site speed
On some shared hosting, you get a small amount of bandwidth, which is sufficient for you in most cases. In the case of hotlinking of images(when someone uses your images without hosting them on their server), it makes your website load slower.
To prevent bandwidth from being stolen from your website, add this code to your htaccess file or use the .htacccess generator website to create a custom htaccess for your need.
## Disable hotlinking of images with forbidden or custom image option ##
RewriteEngine on
RewriteCond %{HTTP_REFERER} !^$
RewriteCond %{HTTP_REFERER} !^http(s)?://(www\.)?yourdomain.com [NC]
RewriteCond %{HTTP_REFERER} !^http(s)?://(www\.)?google.com [NC]
RewriteCond %{HTTP_REFERER} !^http(s)?://(www\.)?feeds2.feedburner.com/yourblogname [NC]
RewriteRule \.(jpg|jpeg|png|gif)$ – [NC,F,L]
For Nginx vhost,
location ~ .(gif|png|jpe?g)$ {
   valid_referers none blocked website.com *.website.com;
   if ($invalid_referer) {
      return 403;
   }
}
⚠️: Please take the full backup of your website before editing the .htaccess file.
Use Caching
When people visit your website, their browser sends requests to your web server. The server then generates the webpage by executing database queries and returning them to the visitor’s browser. The time taken for this initial processing determines how fast your web host is.
The caching layer is present at your server or application level(plugin way).
If it’s on the server level, the cache is built and stored inside RAM or disk; when the user requests the page, the request directly serves static files from the cache layer and eliminates the need to process HTML and database requests.
If it’s at the application level, it’s built and stored inside the disk. When the user requests the page, the request goes through the server > PHP engine > static cache files.
I prefer and recommend server-level caching. It can make your website lightning-fast.
⚠️: If you’re making mistakes with your caching configuration, it will make time-to-first-byte(TTFB)higher and, on Google page speed, generates a “reduced initial server response time” warning. Warning triggers if the TTFB is higher than 600 ms.

⚠️: Running the test multiple times, preferably three to four times, is essential. Running the test multiple times can help you avoid false results, like warning messages that may show up when your website’s cache has expired during the first test, to get accurate speed test results.
You can Implement caching in two ways,
- Server Level
- Application Level (WordPress Caching Plugins)
Server Level Caching
Server-level caching is recommended for any website, and many hosting providers like Kinsta, Rocket.Net, or WPX have already enabled this feature for you for no extra costs.
This method is recommended because it doesn’t require installing a caching plugin or adjusting its settings for the best performance. Everything runs automatically as soon as you start using it.
If you’re running VPS or a dedicated server to host your WP sites, you can use Webinoly to set up Nginx server-level caching. Or you can refer to the documentation of your preferred stack.
WordPress Caching Plugins
If your hosting provider does not offer server-level caching as part of your plan, you must install a WordPress caching plugin to achieve optimal website performance.
Caching plugins create a static copy of your website, reducing server requests and improving page load times by displaying the cached version of a page instead of generating it from scratch. This approach reduces the number of database calls, PHP requests, and HTTP requests (combining multiple files into a single file), resulting in faster page loading times.
Once you have installed an actively maintained caching plugin on your website, you can observe the difference in page loading times between a cached and one not.
Here are my recommended caching plugins,
- WP Rocket(Premium)
- Cache Enabler(Free)
- Super Page Cache for Cloudflare (free)
- LiteSpeed Cache (Free)

WP Rocket is my favorite caching plugin, and I use it on my websites. You can check the WP Rocket review to find out how to use WP Rocket to load the Divi-enabled WordPress site in under 1.5 seconds.
⚠️: If you’re on an OpenLiteSpeed or LiteSpeed Enterprise hosting server, consider using LiteSpeed Cache instead of premium plugins like WP Rocket. It is one of the best free cache plugins available and includes features such as removing unused CSS and image optimization.
✅: Check out a comparison of WordPress’s best user-friendly caching plugins.
☑️: Check out the Cache Enabler review, the best free cache plugin.
✅: Tip: Use server-level caching instead of paid or free plugins. Or use Cloudflare.
Increase Cache Expiration Time
When someone visits your website, their browser downloads all necessary files from your server to their device, and the ‘Expires‘ header specifies when your website’s static content will expire.
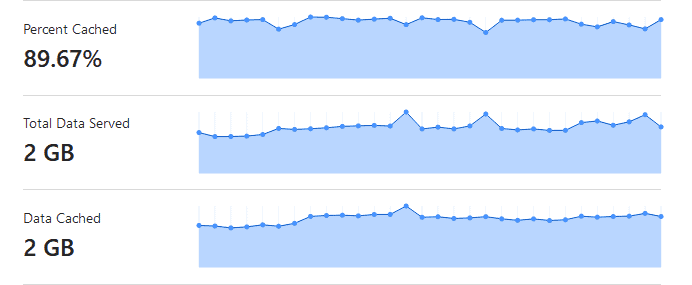
Increasing cache expiration time can improve your website’s performance for returning visitors and address the warning message from Google to “serve static assets with an efficient cache policy.”

Take a look at the example image below. By increasing Cloudflare’s caching expiration time to 30 days, I saved 90% of my website’s bandwidth. This means fewer requests are made to the server, resulting in a faster browsing experience for visitors.
Or, you can add these codes in htacess to enable expire header in WordPress,
## EXPIRES HEADER CACHING ##
<IfModule mod_expires.c>
ExpiresActive On
ExpiresByType image/jpg "access 1 year"
ExpiresByType image/jpeg "access 1 year"
ExpiresByType image/gif "access 1 year"
ExpiresByType image/png "access 1 year"
ExpiresByType image/svg "access 1 year"
ExpiresByType text/css "access 1 month"
ExpiresByType application/pdf "access 1 month"
ExpiresByType application/javascript "access 1 month"
ExpiresByType application/x-javascript "access 1 month"
ExpiresByType application/x-shockwave-flash "access 1 month"
ExpiresByType image/x-icon "access 1 year"
ExpiresDefault "access 2 days"
</IfModule>
## EXPIRES HEADER CACHING ##
For Nginx vhost,
location ~*  \.(jpg|jpeg|gif|png|svg)$ {
		expires 365d;
	}

	location ~*  \.(pdf|css|html|js|swf)$ {
		expires 30d;
	}
The Above numbers are changeable. Change according to your needs.
⚠️: Please take the full backup of your website before editing the .htaccess file.
Don’t want to mess up with your server codes? Then use the Leverage Browser Caching plugin to make your life easier.
Check your websites with the browser caching checker tool to ensure everything works fine.
Enable Gzip Compression
Always serve gzip version of the website to visitors because it compresses the overall web page size and speed of your site.
Check gzip compression of your site with Gzip testing tool.
If you host your website with cPanel or Direct Admin panel, enable gzip from the panel or use plugins like PageSpeed Ninja, Cache Enabler, or WP Rocket.
gzip is also enabled via htaccess for Apache,
## BEGIN : Enable GZIP Compression (compress text, html, javascript, css, xml and so on) ##

AddOutputFilterByType DEFLATE text/plain
AddOutputFilterByType DEFLATE text/html
AddOutputFilterByType DEFLATE text/xml
AddOutputFilterByType DEFLATE text/css
AddOutputFilterByType DEFLATE application/xml
AddOutputFilterByType DEFLATE application/xhtml+xml
AddOutputFilterByType DEFLATE application/rss+xml
AddOutputFilterByType DEFLATE application/javascript
AddOutputFilterByType DEFLATE application/x-javascript
AddOutputFilterByType DEFLATE application/x-httpd-php
AddOutputFilterByType DEFLATE application/x-httpd-fastphp
AddOutputFilterByType DEFLATE image/svg+xml
SetOutputFilter DEFLATE

## END : Enable GZIP Compression ##
For Nginx vhost,
gzip on;
gzip_comp_level 2;
gzip_http_version 1.0;
gzip_proxied any;
gzip_min_length 1100;
gzip_buffers 16 8k;
gzip_types text/plain text/html text/css application/x-javascript text/xml application/xml application/xml+rss text/javascript;

# Disable for IE < 6 because there are some known problems
gzip_disable "MSIE [1-6].(?!.*SV1)";

# Add a vary header for downstream proxies to avoid sending cached gzipped files to IE6
gzip_vary on;
⚠️: Please take the full backup of your website before editing the .htaccess file.
If you’re on Cloudflare, enable Brotli support from “Speed > Optimization >Brotli.” It’s better than Gzip.

Remove Query String
When you analyze your website using website auditor tools, you will find standard advice: remove query strings from your resources. But what does this mean?
Query strings refer to the file numbers added to your CSS and JS files. For example, https://domain.com/file.min.css?ver=6.2. Some servers cannot cache them; removing these query strings can enhance caching efficiency.
You can use function.php to add the following code to your WordPress site,
function remove_query_strings() {
if(!is_admin()) {
add_filter('script_loader_src', 'remove_query_strings_split', 15);
add_filter('style_loader_src', 'remove_query_strings_split', 15);
}
}
function remove_query_strings_split($src){
$output = preg_split("/(&ver|\?ver)/", $src);
return $output[0];
}
add_action('init', 'remove_query_strings')
You can use Perfmatters or WP Rocket to remove query strings to improve the caching functionalities of your WordPress websites.
Optimize JavaScript
JavaScript is a significant factor in slowing down your website. Too much JavaScript can make your site slow and less responsive as it takes more time to process the files, making page loading slower.
A study conducted by HTTP Archive in 2020 found that the median website uses 444 KB of JavaScript, which can significantly burden slower internet connections or devices with limited processing power.
Here are some ways to solve this problem.
Consider your choice of plugins
Plugins on WordPress sites can add lots of JavaScript, slowing down your site. While they’re necessary for some features, too many can hurt. Some plugins add unnecessary JavaScript code, which is terrible for website speed.
Some plugins may load JavaScript on every page, even when unnecessary, which can further slow down your website. As a website owner, it is essential to reconsider using such plugins and explore alternative options that do not add unnecessary JavaScript to your website.
Minify JavaScript
Minification is the process of removing all the white space in your code. Quality themes and plugins included and showed minified resources on the front end. Still, you can use plugins like Autoptimize, Fast Velocity Minify, Perfmatters, or WP Rocket to minify your JavaScript.
If you’re on Cloudflare, enable minification for JavaScript under the “Speed > Optimization > Auto Minify” tab.

Defer JavaScript
When loading, JavaScript files almost always slow down (block) the first paint of your WordPress site’s page. Due to this, you’ll see the “Eliminate render-blocking resources” warning inside the page speed too.

You can defer all non-critical JavaScript to speed up your website. Defer loads files after loading your page, so you’re pushing those files to the bottom of the waterfall.
You can use plugins like Perfmatters, WP Rocket, or Async JavaScript to automatically defer JavaScripts.
Or, you can use the below code,
// Deferred Parsing JavaScript
function defer_parsing_of_js( $url ) {
    if ( is_user_logged_in() ) return $url; //don't break WP Admin
    if ( FALSE === strpos( $url, '.js' ) ) return $url;
    if ( strpos( $url, 'jquery.js' ) ) return $url;
    return str_replace( ' src', ' defer src', $url );
}
add_filter( 'script_loader_tag', 'defer_parsing_of_js', 10 );
The above code defers all JavaScript except jQuery.
Important: If your website uses jQuery, you can’t defer it. To avoid jQuery on your website, use themes like BricksBuilder or GeneratePress, but you can’t remove it from a WooCommerce store.
Delay JavaScript
Delaying the loading of JavaScript until a user interacts with a page can improve a site’s Core Web Vital score and help with WooCommerce performance issues. This is especially useful for third-party scripts like Google Adsense, Google Analytics 4, and customer support apps.
You can use plugins like Perfmatters, WP Rocket, or Flying Scripts to delay Java Scripts automatically.
Remove unused JavaScript
One standard warning the Google page speed tool gives is to “remove unused JavaScript.” This means the current page does not use some of the code in the JavaScript file loaded for the webpage.

Removing this unused code can help make the webpage load faster, which is essential for a better user experience.
⚠️: If you’re new to the WordPress performance optimization process or working on essential websites, I suggest proceeding with caution.
It’s best to test the optimization process on staging websites first or use the JavaScript delay or defer features instead. This will help ensure that you don’t accidentally disrupt the functionality of your website.
To minimize problems with unused JavaScript on your website, use lightweight themes such as GeneratePress or modern page builders like BricksBuilder. With them, you can create a faster and more efficient website that provides a better experience for your visitors.
Use plugins like Perfmatters or Asset CleanUp to disable JavaScript per page.
You can use Plugin Load Filter to disable an entire plugin on a per-page or post.
Host Google Analytics or Third Party Scripts Locally
Google Analytics is the most important tool to understand your audience and improve the content to drive more traffic.
But it has its problems,
- A third-party DNS request is made right away when a website loads.
- Google sets the cache expiration too short, which can cause warnings to show up.
Hosting the Google Analytics script locally provides faster loading times, the freedom to set your caching headers, and eliminates one external domain request.
⚠️: Beware: It’s not officially supported by Google.
You can host Google Analytics locally using Perfmetters, WP Rocket, or CAOS | Host Google Analytics Locally,
☑️: You can use Cloudflare Zaraz to host Google Analytics scripts and other third-party scripts like Facebook pixels on the cloud if you use Cloudflare for your website.
Optimize CSS
CSS helps you make a website look perfect. It is the fourth most significant contributor to the weight of a webpage, after images, videos, and JavaScript.
Let me show you some ways to solve this issue.
Reduce Custom CSS
Sometimes you may not like the way the page looks. You can use custom CSS to customize the look and feel in that case. After a while, when you switch to new themes or plugins, the custom CSS you previously used to modify the layout or looks of your website can become outdated.
This can result in extra CSS that is no longer required, and it can slow down your website’s performance. It’s important to review your CSS and remove any unnecessary code regularly.
Load CSS Only Where Needed
Sometimes, you must add CSS to customize certain parts of your website. But, if you add it to a child theme or the customizer, it can slow down your website’s performance by loading unnecessary CSS on every page.
You can add it conditionally via GeneratePress hooks. First, create a hook, add the CSS, and select where to load.
You can use plugins like Perfmatters or Asset CleanUp to disable or enable the CSS on per-page bases conditionally.
Minify CSS
Most themes and plugins come with a minified CSS file, a smaller original version.
You can check for it by looking at the source code and searching for a filename ending with ‘.min.css’. You don’t need to worry about this step if you find it.
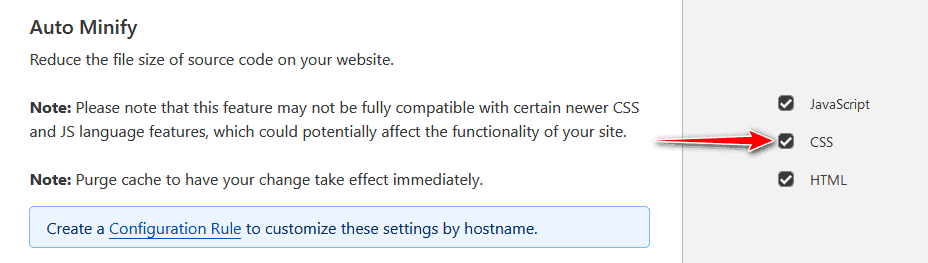
You can still minify your CSS file with Perfmatters, WP Rocket, or Autoptimize plugins. Or use Cloudflare to avoid plugins.
☑️: Recommended: Enable minification for CSS under the “Speed > Optimization > Auto Minify” tab for Cloudflare users.
Remove unused CSS
When you’re doing speed optimization work, you may encounter Google’s “remove unused CSS” feature, which means that the current page does not use lots of code loaded.

⚠️: If you’re new to the WordPress speed optimization process or working on important websites, I suggest proceeding with caution. It’s best to test the optimization process on staging sites first.
You can significantly reduce the amount of unused CSS code loaded on your site by choosing lightweight themes like GeneratePress or using modern page builders such as BricksBuilder.
Google recommends avoiding using CSS-heavy plugins or themes as they can slow down your site.
Using plugins like Perfmatters or Asset CleanUp allows you to disable scripts, queries, and inline CSS/JS per post/page or site-wide basis with just one click.
Remove unused CSS from your website manually using PurifyCSS Online.
Optimize HTML
It improves the structure and size of HTML code to enhance site performance and user experience.
Minify HTML
You can minify your WP HTML output using free plugins like Autoptimize or Fast Velocity Minify.
☑️: Recommended: For Cloudflare users, enable minification for HTML under the “Speed > Optimization > Auto Minify” tab.

Plugins Optimization
Only Use Well Coded Plugin
There are thousands of plugins in the WordPress directory, but not all are well-coded or follow the best coding standards. It is advisable to install plugins that are regularly updated.
How can you find a better plugin for the same problem?

Check plugin ratings first. If it has three stars or less, look for an alternative. If a plugin has no stars and is updated to the latest WordPress version, it’s new in a directory. Try it out on a local host or staging environment.
Why should you avoid installing poorly coded plugins?
Because they can insert inappropriate hooks, CSS, and javascript, which can slow down your site, you shouldn’t install them.
After installing a plugin, use P3 Profiler to check its impact on your website’s performance. It’s not 100% accurate, but it can still help you identify any issues.
✅: For more details, please check out my recommended list of free plugins to make your WordPress faster.
Perform Routine Maintenance on Your Site

WordPress plugins are an easy target for hackers.
Why?
Often, we need to update our WordPress sites which can lead to security vulnerabilities. Research shows that not updating plugins is a significant reason for hacked websites.
It’s important to uninstall and delete plugins that are not needed because they can make your WordPress site slow by calling unnecessary resources.
Optimize database and reduce disk space
Limit and Delete Old Post Revisions
Do you need dozens of post revisions for your published posts? I don’t think so.
You can use WP-Sweep, Perfmatters, or WP Rocket to delete post revisions from your WordPress database and make it smaller and faster.
But, sometimes, while writing posts, we need some revision. If things go wrong, add this code in your wp-config.php before /** Absolute path to the WordPress directory. */,
define('AUTOSAVE_INTERVAL', 600);
define('WP_POST_REVISIONS', 3);
You can change auto-post time 600 to your desired time, time in seconds, and change post revision 3 to whatever you want but keep it below 10.
Reduce and Delete Spam Comments

Comments play an important role in website posts by allowing visitors to discuss ideas, identify problems, suggest improvements, or endorse products/services.
Good comments can boost your search engine optimization efforts since Google considers page engagement an important factor in its ranking algorithm.
However, some visitors use comments for spamming or linking to their websites. Linking to a commentator’s site can encourage visitors to comment on your posts, but it can also result in numerous comments linking to spam sites.
You can activate the Akismet plugin to counter spam comments. However, these comments still go into the spam queue, increasing the size of your database.
I recommend using the Forget Spam Comment plugin, which filters out spam comments without storing them in any queue. Another option is the Zero Spam plugin, which can protect comments and your contact forms.
You can disable the URL field from the comment form using code.
/* Remove URL from WordPress Comment forms */
function bloggyaani_remove_website_field($fields) {
   unset($fields['url']);
   return $fields;
}
add_filter('comment_form_default_fields', 'bloggyaani_remove_website_field', 9999);
Or, you can strip the comment author website clickable link using the code.
// Disable comments author links
if( !function_exists("disable_comment_author_links")){
		function disable_comment_author_links( $author_link ){
			return strip_tags( $author_link );
		}
		add_filter( 'get_comment_author_link', 'disable_comment_author_links' );
	}
Disable Pingbacks and Trackbacks
WordPress uses Pingbacks and trackbacks for interacting with other WordPress blogs.
When someone mentions your blog or site in their posts, it notifies your website, which is often used to get a backlink. However, this could negatively impact your backlink profile and strain your blog’s database.
Turn off Allow link notifications from other blogs (pingbacks and trackbacks) on new articles in your discussion setting.

Disabling this setting can prevent your site from getting affected and reduce database load. For more information, refer to WordPress’s guide on managing trackbacks and pingbacks.
You can add the following code to your function.php file to prevent self-pings from your post. Alternatively, you can use the No Self Pings plugin.
function bloggyaani_no_self_ping( &$links ) {
$home = get_option( ‘home’ );
foreach ( $links as $l => $link )
if ( 0 === strpos( $link, $home ) ) unset($links[$l]);
} add_action( ‘pre_ping’, ‘bloggyaani_no_self_ping’ );
Or,
function bloggyaani_disable_self_trackback( &$links ) {
foreach ( $links as $l => $link )
if ( 0 === strpos( $link, get_option( ‘home’ ) ) )
unset($links[$l]);
}
add_action( ‘pre_ping’, ‘bloggyaani_disable_self_trackback’ );
Delete Old or Unused Images
As time flies, you may have images on your server that are not being used, taking up valuable disk space. This can lead to performance problems, including when backing up your site.
Use the Media Cleaner plugin, which helps clean up your media library from the entries (and files) not used on your WordPress site. Always make sure to take a backup before running this.
Delete Old Data Left by Old Plugins
How many plugins have you installed and uninstalled? Probably many. However, some plugins do not remove everything upon uninstallation, leading to an ever-growing database.
A well-developed plugin should have a clean uninstall option, which can be found in its documentation. You can temporarily reinstall the plugin and run the uninstaller properly if available.
You can use plugins like, Advanced Database Cleaner to clean old plugin data. Always Ensure to clean your WordPress database periodically.
Keep an Eye on the wp_options table (autoloaded data)
To keep your WordPress site running, managing and controlling the autoloaded data field in your wp_options table is important. Limit its total size to 5 MB or less, ideally, 1 MB or less, as it can accumulate over time and slow down your site.
Check manually using phpMyAdmin with the following queries,
SELECT SUM(LENGTH(option_value)) as autoload_size FROM wp_options WHERE autoload='yes';Optimize Videos
Optimizing videos is an important factor for website performance and user experience. Large video files can result in slower page load times, leading to a poor user experience and negatively affecting SEO.
Host Your Videos Externally
This is for you if you are a video blogger or often use videos to explain topics.
Videos require a lot of precious bandwidth and storage space, and different devices require different file sizes. Use Youtube or Vimeo for hosting your videos.
They serve videos based on the visitor’s device size and provide options for any resolution.
Lazy Load Your Videos
Adding YouTube videos to your website can drive traffic, but increasing the page size by 500Kb to 1Mb.
If you embed external videos from YouTube or Vimeo on your website’s homepage or any other page, you may be penalized by Google’s slow-loading website penalty. How to avoid this?
Use the lazy loading technique for videos. You can use a plugin like Lazy Load for Videos, Perfmatters, or WP Rocket, but I recommend using “A Better Method for Embedding YouTube Videos.”
Look at the YouTube video below, which has been embedded using lazy loading techniques.
I have developed a plugin based on the Labnol method, available for download from BGTube.
Once you have downloaded and activated BGTube, you can use the bgtube shortcode to embed your YouTube videos on your WordPress site.
BGTube Feature:
- Replace the
www.youtube.comvideo URL withwww.youtube-nocookie.com. - Load scripts only where bgtube shortcode is used.
Use Solid WordPress Theme/Framework
Themes are an important part of the WordPress ecosystem because they can either attract or distract your visitors. Many themes are available for the WordPress ecosystem, but not all are lightweight. Bloated themes can slow down your site, even with fast hosting and caching. This can severely impact your Google CWV scores.
As a new blogger, everyone is attracted to free WordPress themes or some shiny premium WordPress theme with endless post display settings. These free or premium themes can add unnecessary code to your WordPress site to enhance user experience or without following the WordPress theme’s best practices guide.
Your website may load slowly due to many calls to your server resources caused by unnecessary functions added by these free or premium themes. Some premium themes have a lot of features that may be optional by your website, leading to slower loading times.
Default WordPress themes are typically fast, well-coded, and easy to customize. However, I suggest purchasing a premium theme or hiring a developer if you want more advanced features.
For my websites, I prefer using BricksBuilder or GeneratePress with the GeneratePress premium addon as they generate cleaner code, and you can quickly achieve 100/100 on CWV scores. Currently, BLOGGYAANI is using BricksBuilder.
If you want a clean and lightweight theme for a blog-type website, choose GeneratePress. If you’re going to make an advanced website without compromising speed, choose BricksBuilder.
Font Optimization (Google Webfonts)
Good typography enhances the reading experience and adds visual appeal to a blog, making it more appealing to visitors. That’s why most theme developers include typography options in their themes.
Including these fonts add 10 to 50KB weight to your CSS, and 3 to 6 extra HTTP requests are made to your website.
Here are the options that I recommend for better performance.
Use System Fonts: System fonts are the font that is already available on a user’s device (such as a computer or mobile device) instead of using the custom web fonts that need to be loaded from a server. You don’t need to load any fonts on the page when using system fonts, which is significant. This also eliminates the horror of FOUT (flash of unstyled text) or FOIT (flash of invisible text).
With a theme like GeneratePress, you don’t have to worry about implementing system fonts on your website. Or, change your font family with the below CSS to include them manually.
font-family: -apple-system,BlinkMacSystemFont,"Segoe UI",Roboto,Oxygen-Sans,Ubuntu,Cantarell,"Helvetica Neue",sans-serif✅: Check out the CSS-Tricks System Font Stack article for an in-depth guide.
Self-Host Fonts(Google or Custom): Google Fonts are free and widely used. Today over 60 million sites Google fonts worldwide.
Starting with Chrome 86, released in October 2020, Google has moved to HTTP cache partitioning. In simpler terms, this means that even if the fonts are already saved in a user’s browser, they will be downloaded again for every website that uses them. Safari has been doing this for years, and Firefox implemented it in version 85 in January 2021.
The solution is to host Google fonts on your server or CDN to eliminate DNS lookup to Google and automatically apply the server’s caching HTTP headers. It also helps you to make your website more GDPR compliant.
You can do it manually by downloading fonts from Google, uploading them to your server, and adding proper HTML and CSS.
Or, you can do it via plugins like Perfmatters or OMGF.
If you still want to use Google for your fonts, you can preload them via plugins or manually using the code below.
// Preload Google Fonts stylesheet
function bg_preload_google_fonts() {
  // Replace the URL with the URL of the Google Fonts stylesheet you want to preload
  $url = 'https://fonts.googleapis.com/css?family=Roboto:regular,500,700&display=swap';
  // Add the preload header
  header( 'Link: <' . $url . '>; rel=preload; as=style', false );
}
add_action( 'wp_head', 'bg_preload_google_fonts', 1 );
You must preconnect https://fonts.gstatic.com, use plugins like Perfmatters and WP Rocket, or add it manually.
// Preconnect to Google Fonts server
function bg_preconnect_google_fonts() {
  // Add the preconnect header
  header( 'Link: <https://fonts.gstatic.com>; rel=preconnect', false );
}

add_action( 'wp_head', 'bg_preconnect_google_fonts', 1 );
The above steps will resolve the “Eliminate render-blocking resources” and “Ensure text remains visible during webfont load” warnings.
Font Icons Optimization
Font Awesome is widely used for displaying icons on websites. But, it loads its entire library by default, which can result in unnecessary bloat. For better performance, the recommended way is to include only the icons you need on your site instead of loading the entire library. For in-depth learning, check how to host font icons locally.
You can use SVG files instead of icon fonts with BricksBuilder. This way, you add only what you need.
⚠️: You should preload your font icons to avoid Google’s warning about “preload key requests.”
Choose a Fast Webhost
How can you improve the loading speed of your WordPress site when the web server is causing it to slow down?
Going for cheap web hosting plans that promise unlimited resources can be fascinating when you’re new to blogging. But there may be better options than such plans for optimizing your site’s speed.
As a new blogger, you may face various challenges while hosting your blog, especially if you are on the same server as others who also host their websites on that server.
Regarding shared web hosting, you can’t deny the perks of low cost and unlimited space. However, what happens when you or another user is on the same server and featured on Reddit or Hackernews’s first page?
This can significantly slow your website’s speed, making it as slow as a turtle!
When your website gets high traffic from search engines like Google, it may experience slow loading speeds. Also, your website may go down or run into an issue during peak hours.
After this happens, you may receive an email from your web host notifying you that you need to upgrade to a higher plan because they can no longer handle the increased demand of hosting your blog’s traffic.
Now, how do providers offering unlimited pageviews and bandwidth make money?
To cover their expenses, these providers host thousands of websites on the same server with a shared IP address. As a result, if any of the hosted sites get flagged by search engines, it can negatively impact your site’s SEO.
Before buying a web hosting plan, search for reviews on Google and check communities like WebHostingTalk. Avoid getting trapped in unlimited hosting plans. Check this; beware of “Web Hosting Review” and “Top 10 Web Hosts” sites.
Below, I have categorized WordPress Hosting into three different categories.
✅: For more details, please check out my guide on choosing the performance-optimized WordPress host.
Affordable WordPress Hosting
If you want affordable WP-optimized hosting, consider checking out MyW or A2 WordPress hosting.
MyW offers excellent shared hosting with 25GB SSD disk space for just 5€ per month. You can also wait for occasions like Cyber Monday to get dirt-cheap offers from them.
A2 WP Hosting offers managed WP hosting starting from $2.99* per month with the latest features, such as the latest PHP, HTTP/2, SSD, free SSL certificates, and many more.
I am currently using MyW to host BLOGGYAANI.
Premium WordPress Hosting
Every business has unique needs, and that’s why some websites may need premium WordPress hosting. Consider choosing providers like Kinsta, Rocket.Net, or WPEngine for high-traffic websites or large projects.
Rocket.Net is a Cloudflare business’s powered Managed WordPress hosting provider that prides itself on being the fastest. This means that your site’s assets (static and dynamic) are always cached near your visitor’s location.
Kinsta provides fast Managed WP hosting powered by Google Cloud.
WPEngine, a leading provider of WP-managed hosting, offers plans starting at $20* per month.
Geeky [DIY] WordPress Hosting
If you’re a tech-savvy blogger or want more control and power than a shared hosting environment without breaking the bank, consider selecting a Virtual Private Server (VPS) provider.
For this type of web hosting, you have complete control over managing the server, or you can pay a provider to manage it at an additional cost.
If you choose this option, choose an unmanaged VPS from Vultr or Digital Ocean.
But, Masood, how can I manage the server myself?
Don’t worry. You can manage your server easily with the help of a self-managing panel or scripts like Webinoly, CloudPanel, WordOps, CyberPanel, or aaPanel. These scripts and panels help you to set up a world-class WordPress-optimized environment in just a few minutes.
☑️: Do you prefer a web control panel over a CLI-based LEMP stack? Check CloudPanel – a free, web-based server control panel optimized for speed.
Content Delivery Network(CDN)
Even with the fastest WordPress hosting provider, network latency remains an issue. This is because the server’s physical location in a data center affects the speed of website download, and the farther away the user is, the slower it gets.
A CDN helps offload static resources like CSS, Javascript, Images, and files from your primary server to edge servers worldwide. This helps in caching these resources and delivering them from the nearest geographical edge server to the visitor instead of the primary server, which helps reduce the workload on the primary server.

For instance, if your server is hosted in New York and a user visits from India, the CDN will load static files from the Asian data center to ensure faster loading times.
If you’re a new blogger on a tight budget, consider Cloudflare. It acts as a CDN and provides security features such as blocking malicious bots and visitors, making your site safe and faster.
⚠️: Info: With WP Cloudflare Super Page Cache, you can simulate Cloudflare’s $5 APO feature on its free tier.

Consider using the commonWP plugin if you don’t want to use Cloudflare but still want to offload some assets to a CDN for free. This plugin allows you to use a jsDelivr, a free and public CDN for open-source JavaScript and CSS files.
You can use any CDN provider with plugins like Perfmatters, WP Rocket, or CDN Enabler.
Misc. Optimizations, Resources, and Tips
Don’t Use a Slider
Consider using a static header instead of sliders, as sliders can cause significant layout shifts (CLS) on Core Web Vitals, particularly on mobile, and harm your conversions.
Optimize Your Homepage to Load Quickly
Optimize your blog’s front page and adjust your theme’s default settings. Avoid displaying too many posts or using infinite scrolling pagination.
Keep these points in your mind while optimizing your front page,
- Display the summary instead of the entire post
- Reduce the number of posts on the front page(Mine is 4-5)
- Remove sharing widgets from the front page
- Remove unnecessary widgets from your front page
- Don’t display too many ads, or won’t display it.
- keep it simple
Use the latest version of PHP.
Using the latest PHP version for your website is important for ensuring optimal performance and faster page load speeds.
PHP is a programming language for creating dynamic web pages and applications, and each new version offers performance and security. Upgrading to the latest PHP version can drastically improve your WordPress website’s speed and stability.
Additionally, newer PHP versions have improved memory usage, reducing the load on your server and improving overall performance.
Avoid Redirects
Adding redirects to your website can hurt your site performance, even if it’s small. Many popular WordPress plugins use the wp_redirect function, especially those running on Nginx, which can be a major problem.
Every incoming redirect triggers PHP code on your server to process and forward the request, which can slow down your site. This becomes a huge problem with a huge number of redirects and traffic.
To handle WordPress redirects more efficiently, it is recommended to handle them at the server level, which can eliminate the need to execute any code on your server.
I use Yoast’s affiliate link clocking script and a simple .htaccess or Nginx Vhost to handle server-level redirects.
Disable WP-CRON
WP-CRON is a task scheduler that checks the list of scheduled tasks on every page load, causing performance issues on high-traffic sites. Disabling WP-CRON and using a server-level (system) cron is a better solution.
To disable WP-CRON, add the following code to your wp-config.php file before the line that says, “That’s all, stop editing! Happy blogging.”
define('DISABLE_WP_CRON', true);Once WP-CRON is disabled, scheduled tasks can be triggered by wp-cron.php using a server or third-party service. This ensures that tasks execute properly on your WordPress site and reduces the load on your server since it runs on a schedule instead of constantly.
I use DirectAdmin’s built-in cron job manager, and if you’re on Cloudflare, you can set up external cron jobs using Cloudflare Workers Cron Triggers.
Summary

Site speed plays an important role in search engine rankings. With users’ increasing usage of mobile devices, site speed has become more important than ever. Neglecting site speed can harm your website’s ranking.
Studies show that people prefer sites to load within three seconds. If the loading time is within this limit, users may abandon your website, decreasing customer satisfaction.
To make your website faster, consider investing daily time to learn effective strategies to speed up your WordPress site. These tips will help optimize your blog’s performance and keep visitors happy.
Check BLOGGYAANI speed on GTmetrix,

Can you speed up your WordPress website faster after reading and applying these techniques to your site?
Do you have any other ideas to make WordPress websites faster and load quicker?
Don’t forget to bookmark this post because I keep updating it with new ways and tips to speed up WordPress sites.
Thank you for reading! If you liked this article, please share it.

Barakha
Due to its simplicity to use features and a large library of easily available plugins, even a new or zero-knowledge tech person like me can build professional websites by using WordPress. And following some new updates in Google’s ranking algorithm, site loading speed has become even more necessary for a ranking website.
Thank you so much for sharing an excellent article about “Faster Loading WordPress Plugins”. These are the plugins that I feel everybody needs to be used in their blogging life. Now as you explain superbly the use of plugins to us, I am going the practice those to my blog. Also, with my experience, I highly suggest you configure Cloudflare with your website. It’s free, easy to install and it offers free CDN to make your blog fast and secure.
One quick question; using too many plugins makes the blog or website load slowly. What do you say? Thanks in advance.
masoodalam51
I am using 5 to 20 plugins on any blog, depending on website needs. If you are using good plugins with clean code, no unnecessary resource calling, and minimal impact on your loading speed, you can use as many plugins as you need. Always check the performance of the website and the load on the server after activating any plugin on your site.
Syed Saadullah Shah
highly recommended blog post for newbies. Speed is crucial and page builders are just destroying everything day by day.
masoodalam51
If you’re referring to old page builders like Elementor or Divi, then yes, they are not speed-friendly. However, if you closely observe Divi’s progress nowadays, you’ll find that they have been improving their page builder in terms of speed.
These page builders are ideal for newcomers who want to quickly design their website. With the help of WP Rocket or Litespeed Cache plugins, per-page CSS generation ensures that the entire mammoth CSS file of the page builder does not load on every page. This optimization makes the website load faster and, in many cases, reduces the CSS payload by almost 300 to 400kb on each page.
If you still want to use page builders, I recommend checking out Oxygenbuilder. It leans more towards developers, but it allows you to selectively load only the desired CSS or JavaScript files on a per-page basis. Alternatively, you can explore Bricksbuilder, which maintains the speed advantages of Oxygenbuilder while catering to regular users.
If you prefer not to use page builders at all, Gutenberg is a great option for designing your website. The output from Gutenberg pages is significantly lighter, approximately 10 times lighter, compared to mammoth page builders like Elementor or Divi, while offering the same design capabilities.
Emma Butler
Proper cleaning makes the website user-friendly and easy to access. Thanks for the great tips.
Sagar Shah
Hey, Shaikh Masood Alam Nice thoughts that how to speed up WordPress site like a pro.
Enhancing the performance of the existing website is perhaps the biggest challenge faced by many WordPress website owners in recent times. As per google the latest recommendation, website performance is a key ranking factor.
And the most important thing is that the techniques are very useful for my website.
Thanks for sharing this Article it is such knowledgeable for me.
Samueal Smith
Great list you’ve curated here. My favorite is Autoptimize. I’ve been using it for a year or two now. It’s the best tool I’ve found for doing critical CSS. Also wanted to thank you for bringing WP Disable to my attention. Haven’t heard of that one before and it seems to have some great functionality, so thank you!
Nick
Thanks for sharing What I am looking to speed up after the google update, I got a penalty for ranking down only because my site speed is low but now I try your suggestions.
Samuel
Instead of plugins, I can see some coding solutions to speed up the website.
That’s the most authentic article to optimize the speed of a WordPress site.
You’ve done a great job.
masoodalam51
Thank you, Samuel, for your comment. I prefer to keep a low plugin count on my Plugins page.
Spacema
Good article. Also, several tips on how to optimize the homepage:
1) Show excerpts instead of full posts.
2) Reduce the number of posts on the page (I like showing between 5-7).
3) Remove unnecessary sharing widgets from the home page (include them only in posts).
4) Remove inactive plugins and widgets that you don’t need.
Awais
A seriously good and comprehensive post, surely going to tweet it. Also, a video on this topic ( Aimed at beginners ) would be a great thing I believe.
T I Antor
Hey Masood,
It has been a great and useful post for me. I learned many new things from your post. My site was running slow and when I tested my site speed for mobile and desktop versions then found a few problems. I solved those and find new terms on your post to learn. I bookmarked your post for future reference. Indeed, you have done great work.