Managing an unmanaged VPS can be challenging, especially for beginners.
It involves reading tutorials, experimenting with codes, and constantly searching for solutions when issues arise. While this process may seem enjoyable, reliability is the key factor when it comes to hosting important websites or business operations.
Fortunately, there are ready-made scripts available on the internet, such as Webinoly, that can assist you in achieving reliability. However, using these scripts still requires command-line management knowledge. But don’t worry. There is a solution to avoid this.
Introducing CloudPanel, a powerful Nginx server hosting environment for your WordPress or any website. With just one line of code in the console, you can create a robust setup that includes the PageSpeed module, Redis, File and Backup manager, and Varnish cache.
If you’ve been using CPanel or Direct Admin Hosting in the past, you’ll find CloudPanel to be a minimalistic web-based interface hosting panel that caters to all your website’s needs.
With CloudPanel, you can get,
- Server to host and run static websites, PHP, WordPress, Node.js, and Python applications.
- Web-based interface panel to manage your server. You can use the command line if you wish.
- Easy-to-use installation wizard that offers to set up multiple types of software applications.
- Fully isolated environment for each website.
- 11+ pre-configured components to maximize efficiency, like Nodejs, PHP, Python, Redis, Varnish, MySQL, MariaDB, Security Firewall, ProFTPD, etc.
- 30+ pre-configured Vhost templates for maximum speed, like WordPress, WooCommerce, Joomla, Moodle, Mautic, WHMCS, Angular, etc.
- Cloudflare integration, IP blocking, and Bot blocking.
- PHP 8.2, 8.1, 8.0, 7.4, 7.3, 7.2, and 7.1 support.
- Easy to use Cron Jobs manager.
- Backup manager with multiple backup provider supports.
- Let’s encrypt SSL manager with automatic renewal.
- Server resource monitoring on admin dashboard.
- Real-time Access and Error logs are shown in the panel.
- Helpful Discord Community.
Click here to learn more about the features of CloudPanel.
In this article, I will guide you through the installation process of CloudPanel, which is compatible with Debian 11 or Ubuntu 22.04 operating systems and supports Intel x86 or ARM processors.
For this tutorial, I will be using a MaxKVM VPS. You can use any VPS provider for your websites, such as DigitalOcean, Vultr, or others.
☑️: To learn more about different hosting types and companies, check out our guide on how to choose the best WordPress hosting.
✅: If you prefer using the command line interface (CLI), follow our tutorial on installing Webinoly and discover how to manage super-optimized WordPress sites within minutes using Webinoly.
CloudPanel Installation
Installing CloudPanel is a simple process. Visit the “Getting Started” page and choose your preferred cloud hosting provider, like DigitalOcean or Vultr. Alternatively, you can proceed with the installation on other hosting platforms.
⚠️: Before running the installer, updating the system and installing the necessary packages is important. Please note that this step is crucial.
apt update && apt -y upgrade && apt -y install curl wget sudoI am using a MaxKVM VPS running Ubuntu 22.04 LTS and MariaDB 10.9. Please refer to the additional documentation for detailed installation instructions for this tutorial.
curl -sS https://installer.cloudpanel.io/ce/v2/install.sh -o install.sh; \
echo "d67e37c0fb0f3dd7f642f2c21e621e1532cadefb428bb0e3af56467d9690b713  install.sh" | \
sha256sum -c && sudo DB_ENGINE=MARIADB_10.9 bash install.sh
Once the installation is complete, you will receive the URL for your CloudPanel web interface, including the 8443 port.

By default, the CloudPanel web interface can be accessed via https://yourip:8443. When accessing it through a browser, you might encounter an SSL warning. Ignore the warning and click “Advanced” and “Proceed” to continue to CloudPanel.
Welcome Screen:
Before accessing CP, you need to create an administrator user. The account creation process is as follows:

Frontend Area
After creating the user and logging in for the first time, you will be presented with a screen similar to the one below:

Dashboard:
Clicking on the “Dashboard” tab provides you with a complete overview of your machine, as shown below:

Dark Mode:
If you prefer dark mode over the normal, CloudPanel has covered you. Click the “moon button” to enable dark mode.
Admin Area:
The Admin Area provides tabs for Users, Events, Instance, Backups, Security, Settings, and Support.
Users:
In this section, you can add additional users, define their roles (Admin, User, Site Manager), set their status (Active or Not Active), and assign sites to them.

Events:
Here, you can view all the important activities and details related to your panel.

Instance:
Services: Here, you can view your instance’s running services. You can restart the services or reboot the server directly from this interface.

Settings: You can change the Timezone from here.

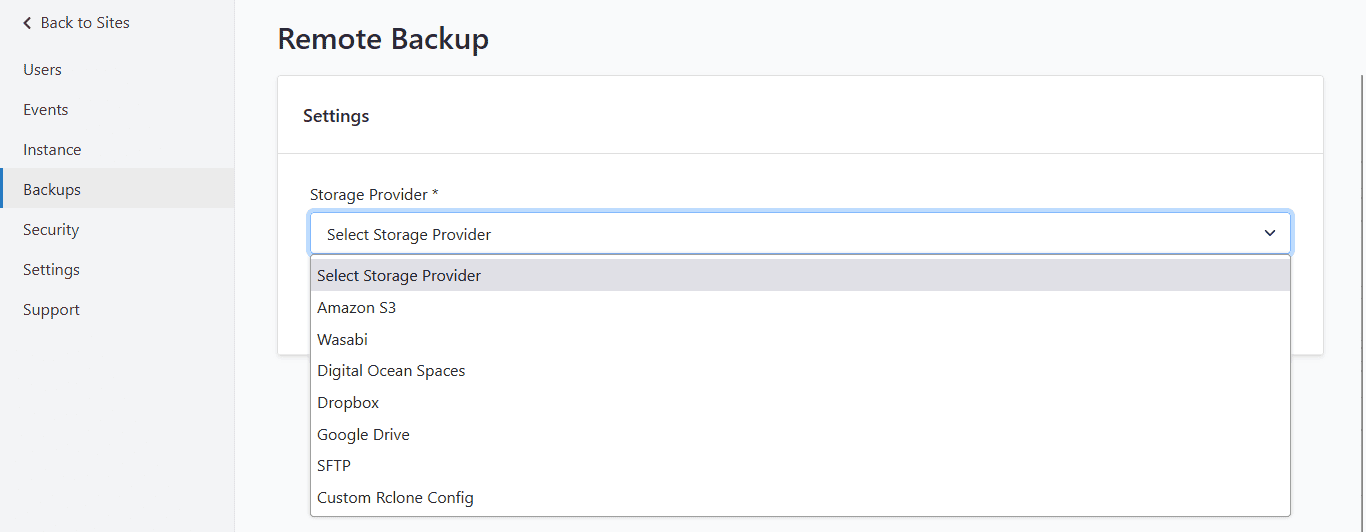
Backups:
You can configure server-level backups here, eliminating the need to install backup plugins. CloudPanel offers various storage providers for your convenience. Click here to learn more about how to configure CP backups.
Security:
Firewall: This basic firewall uses UFW to secure the port range on your server. You can use the “Add Rule” button to add rules specific to your applications.

Basic Auth: Basic Auth adds an extra layer of security to your CloudPanel login screen.

⚠️: Remember to click the “Save” button after making changes.
Settings:
General: To access CloudPanel with a custom domain, add the domain and ensure that the DNS record points to the server IP. This step is necessary to issue a Let’s Encrypt SSL certificate for the CP custom domain.

Database Servers: Here, you can view all the available database instances. You can add a new or remote instance using the “Add Database Server” button.

Support:
The Support tab redirects you to the CloudPanel Contact Us page.
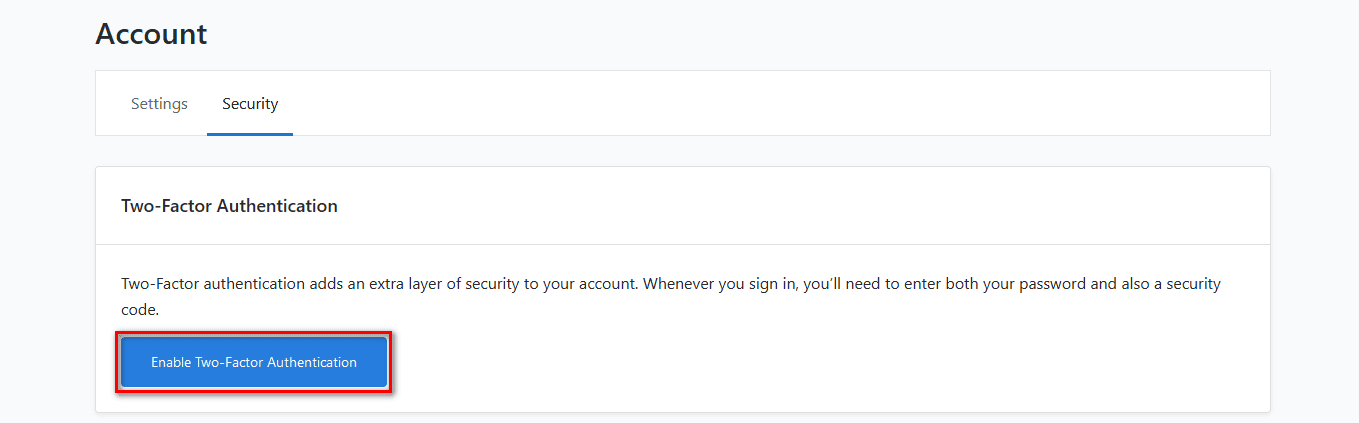
Account:
Clicking on your avatar will open the account settings page.
Settings: You can edit your password, name, email, and timezone here.

Security: You can enable Two-Factor Authentication for your profile here.
Sites:
When you click on the “Sites” tab in the CloudPanel header for the first time, you will have a blank page featuring the “+ Add Site” button.

How to Create Sites in CloudPanel
Clicking on the “+ Add Site” button will take you to another screen where you can choose from five options, each catering to various website needs.
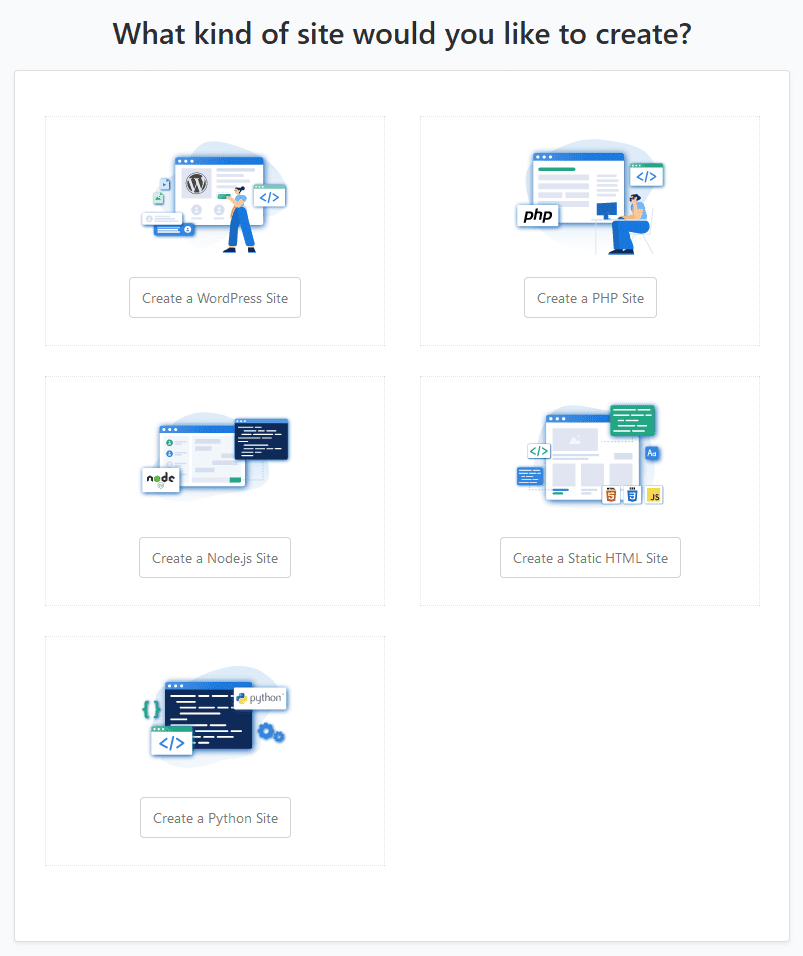
In this tutorial, I will be creating a WordPress website. All the settings provided are specific to WordPress, but you can customize them for other websites.
New WordPress Site Installation:
After clicking on the “Create a WordPress Site” button in the previous steps, a new window will open where you can find and modify details about your new WordPress website.

Upon pressing the “Create” button, a new screen will appear, displaying all the details about your website, including the site, database, and WordPress details.

Clicking the “Back to Sites” button will take you back to the sites page, where you will now see your newly created website with the “Manage” button.

☑️: With CloudPanel, you can create a speed-optimized WordPress website in just minutes.
Site Settings Management in CloudPanel
CloudPanel is an extraordinary panel with finely tuned templates that cater to general website demands. But sometimes, we need to customize it further to meet specific project requirements.
In CloudPanel, you can make these customizations without executing any complex code in the console. Click on the “Manage” button for your newly created website.
On the next screen, you will find multiple tabs and settings. Don’t worry. Below you will find a detailed explanation of each tab and setting.
Settings:

Domain Settings:
If you want, you can change the root directory from this section.
⚠️: Remember to click the “Save” button after making changes.
Site User Settings:
You can generate a new password or add SSH keys from here.
⚠️: Remember to click the “Save” button after making changes.
PHP Settings:
In the PHP Settings, I will explain the most important settings only.
- PHP Version: You can select the PHP version from here, ranging from 8.2 to 7.1.
- memory_limit: You can change the allocated memory for your site from this section, such as reducing it from 512 MB to 256 MB.
- max_execution_time: If you use a standard theme like GeneratePress, a 1-minute timeout is fine. But, if you are using page builders like Bricks Builder or WooCommerce, ncreasing the timeout to 3 minutes is recommended.
- upload_max_filesize: Sometimes, you need to upload files larger than 64 MB. You can modify this limit to your desired value from this section.
- post_max_size: When modifying the “upload_max_filesize” value, update the corresponding value in this section.
- Additional Configuration Directives: Sometimes, you need to change things in the “php.ini” file. Add those values here for the same results.
⚠️: Remember to click the “Save” button after making changes.
PageSpeed:
CloudPanel includes an Nginx PageSpeed Module, which enhances the performance of your websites and helps improve their core web vitals. To use it, turn on the “Toggle” button and click the “Save” button.
⚠️: Remember to click the “Save” button after making changes.
✅: If you wish to modify the settings of PageSpeed, please refer to the Official PageSpeed Configuration Guide.
With the PageSpeed module enabled for your website, there is no need to depend on paid or free plugins to make your WordPress site faster.
Delete Site:
You can permanently delete your sites, including all settings and files, in a non-recoverable manner.
Vhost:
A Virtual Host (Vhost) or Server Block is an Nginx configuration file that allows you to host multiple websites or redirect traffic from one site/page to another. You can learn more about Vhost/Server Block configurations here.
CloudPanel offers over 30+ pre-defined Vhost templates. Below is an example of a WordPress Vhost template.

⚠️: Remember to click the “Save” button after making changes.
Databases:
You can add a new database by clicking the “Add Database” button. Or, You can delete any existing database using the “Delete” button.
With just one click of a button, you can “manage” your database using PHPMyAdmin, with the auto-login feature for convenience.

Varnish Cache:
Varnish Cache is a powerful caching system that, when paired with Nginx, creates a powerful caching combination. To learn more about Varnish Cache and its settings, refer to the CloudPanel documentation.
[bgtube v=”fGD14ChpcL4″}
Benefits of Varnish Cache:
- Blazing Fast Page Loads – Up to 250x faster
- Up to 80% savings in Infrastructure
- Improved User Experience
- Better Search Ranking
⚠️: After enabling Varnish Cache in CloudPanel, install and activate the CLP Varnish Cache Plugin in WordPress to clear the cache. Or you can also purge the cache directly from the panel.

⚠️: Remember to click the “Save” button after making changes.
CloudPanel includes an integrated Redis server. While it may not be necessary for regular websites, enabling it becomes critical for highly dynamic websites like WooCommerce or news websites. Install and activate the Redis Object Cache plugin to utilize its benefits.
Enabling Varnish cache and PageSpeed together eliminates the need for plugins like WP Rocket or Cache Enabler to improve the speed of your sites.
SSL/TLS:
You can generate Let’s Encrypt SSL certificates or import certificates from another provider.
When you first create a website, CloudPanel provides a self-signed certificate for the website. To obtain a Let’s Encrypt SSL certificate for your new website, you can navigate to this tab and generate it.

Security:
- IP Blocking: You can block individual IP addresses (IPv4, IPv6) from this section. Click on the “Add IP” button to block an IP. E.g.:
- 8.8.8.8 (ipv4)
- 192.168.0.1/32 (ipv4 CIDR Format)
- 2400:6180:100:d0::99b:5001 (ipv6)
- Bots Blocking: You can ban specific bots from accessing your website. Click the “Add Bot” button and enter the bot name to block it.
- Basic Authentication: You can add basic authentication to your website from here. Enter the desired username and password, and click the “Save” button. After that, toggle the “Basic Authentication” switch to enable it.
- Cloudflare: You can restrict access to your website only through Cloudflare by enabling the “Allow traffic from Cloudflare only” option. This helps save bandwidth, mitigate attacks, and reduce spam.
- For optimal performance and security, ensure that your domain’s name servers point to Cloudflare and that the orange proxy is enabled for your DNS records.
⚠️: Remember to click the “Save” button after making changes.

SSH/FTP:
You can add site-specific new SSH and FTP users from here.

File Manager:
CloudPanel provides a user-friendly file manager for your website. You can easily upload, download, cut, copy, paste, delete, rename, and compress files from here.

Cron Jobs:
You can add server-level cron jobs by clicking the “Add Cron Job” button.

⚠️: Always prefer server-level or external cron jobs over the default WordPress cron for better performance and reliability.
Logs:
You can view the latest Nginx and PHP-FPM access and error logs here.

CloudPanel Optimized WordPress GTmetrix results
Here’s a quick comparison to demonstrate the power of CloudPanel’s server-level caching without using any caching plugin.
For this comparison, I’m using the GeneratePress Construction demo. The test website is hosted on a MaxKVM 1GB VPS, and the website’s performance is benchmarked using the GTMetrix Vancouver location.
Default CloudPanel WordPress GTmetrix results:

| Performance | 100% |
| Structure | 93% |
| LCP | 516ms |
| First Contentful Paint | 375ms |
| Time to Interactive | 383ms |
| Speed Index | 491ms |
| Backend Duration | 151ms |
| TTFB | 241ms |
| First Paint | 376ms |
| Onload Time | 679ms |
| Fully Loaded Time | 718ms |
| Requests | 27 |
| Page Size(Compressed) | 2.97MB |
| Page Size(Uncompressed) | 3.24MB |
Varnish Cache Enabled CloudPanel WordPress GTmetrix results:

| Performance | 100% |
| Structure | 90% |
| LCP | 463ms |
| First Contentful Paint | 264ms |
| Time to Interactive | 395ms |
| Speed Index | 414ms |
| Backend Duration | 71ms |
| TTFB | 154ms |
| First Paint | 264ms |
| Onload Time | 673ms |
| Fully Loaded Time | 711ms |
| Requests | 26 |
| Page Size(Compressed) | 2.97MB |
| Page Size(Uncompressed) | 3.24MB |
Varnish Cache and PageSpeed Enabled CloudPanel WordPress GTmetrix results:

| Performance | 100% |
| Structure | 97% |
| LCP | 485ms |
| First Contentful Paint | 285ms |
| Time to Interactive | 470ms |
| Speed Index | 441ms |
| Backend Duration | 71ms |
| TTFB | 169ms |
| First Paint | 285ms |
| Onload Time | 559ms |
| Fully Loaded Time | 601ms |
| Requests | 26 |
| Page Size(Compressed) | 1.72MB |
| Page Size(Uncompressed) | 2.02MB |
Summary
CloudPanel offers a powerful web-based interface control panel for efficient server management. It provides a pre-configured, high-performance WordPress website that prioritizes speed. With built-in Varnish Cache and PageSpeed, there is no need for premium caching plugins for WordPress.
The table below demonstrates that with CloudPanel, there is no need for a premium or free caching/optimization plugins to enhance the speed of your WordPress site.
| Caching Name | Default WordPress | Varnish Cache | Varnish+ PageSpeed |
| Performance | 100% | 100% | 100% |
| Structure | 93% | 90% | 97% |
| LCP | 516ms | 463ms | 485ms |
| First Contentful Paint | 375ms | 264ms | 285ms |
| Time to Interactive | 383ms | 395ms | 470ms |
| Speed Index | 491ms | 414ms | 441ms |
| Backend Duration | 151ms | 71ms | 71ms |
| TTFB | 241ms | 154ms | 169ms |
| First Paint | 376ms | 264ms | 285ms |
| Onload Time | 679ms | 673ms | 559ms |
| Fully Loaded Time | 718ms | 711ms | 601ms |
| Requests | 27 | 27 | 26 |
| Page Size(Compressed) | 2.97MB | 2.97MB | 1.72MB |
| Page Size(Uncompressed) | 3.24MB | 3.24MB | 2.02MB |
This table shows that CloudPanel outperforms popular caching plugins, delivering faster load times without any additional plugins.
With CloudPanel, you can eliminate the need for various plugins on your WordPress sites, such as,
- Caching Plugins
- Redirection Plugin: (Learn how to clock affiliate links on the server.)
- Security Plugin
- Backup Plugin
Plugins like Plugin Load Filter and Perfmatters offer valuable benefits for optimizing your WordPress setup by reducing unnecessary bloat. With CloudPanel’s powerful features combined with these plugins, you can achieve a highly optimized and efficient WordPress site.
CloudPanel is a user-friendly and free server control panel suitable for beginners and experienced users. Whether you’re new to server management or an expert in the hosting industry, CloudPanel simplifies everyone’s tasks and makes them easier.
Please share your experience by leaving a comment below! We would love to hear about how it works for you.
