I use plugins daily to enhance my WordPress site’s functionality.
Whether it’s adding contact forms or optimizing the speed of an eCommerce store, WordPress offers a vast array of plugins to meet every need.
Need affiliate tracking or a clock function on your site? The WP repository has you covered.
However, not all plugins are created equal. Poorly coded plugins can load unnecessary resources on every page, dragging down your site’s speed and SEO performance.
But what if you could manage plugin load without sacrificing your website performance?
Enter Plugin Load Filter.
This free plugin lets you selectively deactivate plugins on a per-page and per-post basis, keeping your site fast and efficient.
In this guide, I’ll show you how to use Plugin Load Filter to streamline your WordPress site and boost its performance.
Let’s get started.
Why must we remove/deactivate unnecessary plugins on a post/page basis?
Plugins are essential for enhancing WordPress functionality, with most sites using 10 to 20 plugins. Some of these plugins are specific to the admin dashboard or certain pages and posts.
Consider Contact Form 7, a widely used plugin with over five million installations, which creates contact forms. If you only need Contact Form 7 on your Contact Us page, WordPress still loads its CSS and JS files on every page, leading to slower load times.
Even a single unnecessary plugin can add 50 to 100 milliseconds to your page load time. Multiply this by 20 plugins, and you’re looking at an additional 1 to 2 seconds.
This delay triggers warnings in page speed tools and negatively impacts your SEO efforts.
By removing or deactivating plugins on a per-page basis, you eliminate unnecessary CSS and JS files and avoid executing PHP logic on pages where it’s not needed.
This improves your site’s speed and performance, benefiting both your users and your web hosting account.
Plugin Load Filter – Cut Unnesacary Plugin Fat(Logic/CSS/JS) from Post/Page
Plugin Load Filter (PLF) is a free plugin with over 10000+ active installs. It is a simple and lightweight plugin that allows you to conditionally load plugins for unwanted pages/posts.
Unlike plugins like Perfmatters or Asset CleanUp, PLF does not assist with the conditional loading of CSS or JS. Instead, it enables you to conditionally load the entire plugin as needed.
While I know it is possible to achieve that with Perfmatters or Asset CleanUp, discussing those options would be beyond the scope of this post.
Please note that Perfmatters is a premium plugin, and Asset CleanUp is a freemium plugin (with a free version and premium add-ons). Additionally, PLF offers a premium URL filter add-on that allows for more advanced filtering capabilities beyond the standard features.
I am using the standard version available in the WP plugin directory for this blog post, as it is more than enough for our purposes.
PLF Features:
- Support Post Format type
- Supportpport Custom Post type
- Support Jetpack Modules filtering
- Support WP Embed Content card (is_embed template)
- Support Simple Post Language Locale switcher
How can Plugin Load Filter(PLF) selectively load plugins on your WP website?
Install and Activate PLF on Your Website:
You need to install PLF on your WordPress website to gain full control over your plugin’s loading behavior.
Go to Plugins > Add Plugins, search for “plugin load filter,” and then install and activate the plugin.

Access Plugin Load Filter Settings Page:
Once you have activated the plugin, check the left sidebar for the Plugin Load Filter tab. Click on that tab to access the PLF settings page.

Configure Plugin Load Filter Settings Page:
Upon clicking on the plugin setting page, you will have a simple page displaying all the activated plugins. Here, you will find two different tabs.
- Filter Registration
- Page Type Activation
For Page Type Activation to work, it is necessary to configure the Filter Registration tab first.

- You’ll see three types of Page Type Filter here. Choose carefully.
- Normal – Exclude plugin from Page Type filter.
- Admin Type – If you only use plugins for Admin pages.
- Page Type – If you want to activate or deactivate each Page Type and Single page plugin.
- Add a link to the admin bar. Also, you can see which plugin deactivates or activates for the given page.
- I never use these post types on my websites, so just tick it or leave it.
- If you’re using your website’s multilingual feature, tick it.
- After configuring all settings, save the settings with the Filter Entry button.
- After pressing the Filter Entry button, Page Type Activation activates.
- To activate the Filter Entry tab, you must choose some plugins Page Filter Type is page type.
Plugin Load Filter Settings – Filter Registration:

To showcase the functionality of PLF, I have activated three plugins.
- Normal: plugin load filter
- Load everywhere on the website.
- Admin Type: Disable Generate Thumbnails
- Load only on the admin side of the website.
- Page Type: Contact Form 7 and WP Show Posts
- You can configure how they load on a per page/post basis.
Plugin Load Filter Settings – Page Type Activation:

- You have two options: Desktop and Mobile. Select the one that suits your requirements. I always recommend ✅ activating this feature.
- I plan to display Contact Form 7 exclusively on the Contact Us page, while WP Show Posts should only appear on blog posts.
- By ✅ checking these options, you enable CF7 to load on every page and WP Show Posts to load on every blog post.
- I use WP Show Posts to display related posts below the content. Therefore, I can activate this option here, which ensures it loads on every blog post.
- For more granular control, don’t activate this option. Control it from the post/page itself.
- By ✅ checking these options, you enable CF7 to load on every page and WP Show Posts to load on every blog post.
- Click on Activate Plugin Entry to save the option.
How to Control Plugins from Post/Page Editor:
You will find the PLF setting box on the right side of the post/page editor. From here, you can enable or disable plugins.
CF7 Disabled Demo:
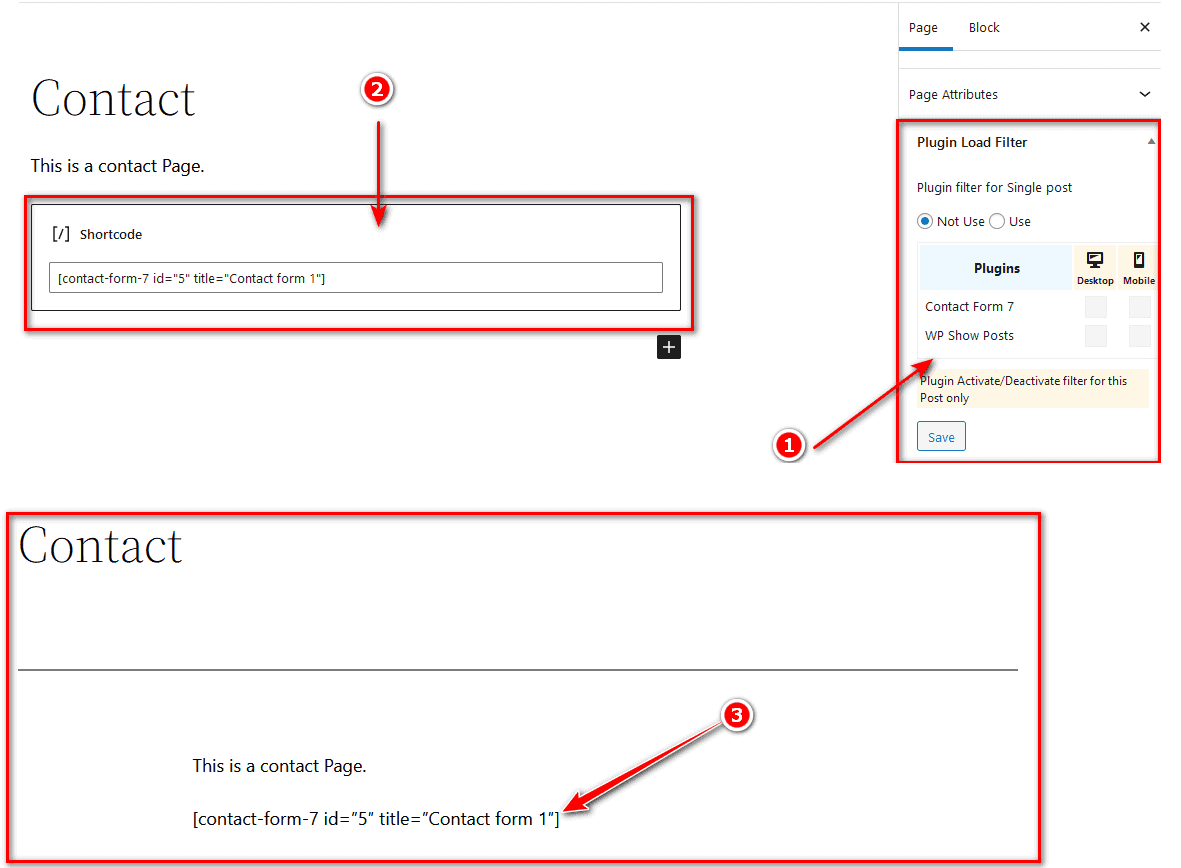
- I am adding a contact form using Contact Form 7 on the Contact page.
- You can enable or disable plugins from this box. As you can see, I have currently disabled CF7 from loading on this page.
- This is the actual frontend page where you can observe that CF7 cannot render the shortcode in its intended form.
CF7 Enabled Demo:

- Now, ✅ check the box to enable and select Contact Form 7 (or any other desired plugin) to load on the page. Check the mobile and desktop options or choose according to your requirements.
- Verify on the front end that the Contact Form 7 is now visible on the page instead of displaying the shortcode.
Plugin Load Filter Alternatives
PLF is a powerful plugin for controlling the loading behavior of your plugins, but it offers basic functionality. Here are alternatives that provide more advanced options and features for better control.
- Perfmatters is a premium WordPress performance plugin that helps you disable/enable or control plugins, CSS, JS, and unnecessary database calls per page/post. It assists in removing unused CSS, minifying CSS, and JS, and achieving high scores on web vitals tools. You can use it alongside WP Rocket or Cache Enabler for optimal results. Additionally, if you have a hosting company like Kinsta or Rocket that offers server-level caching, it can further enhance performance.
- Asset CleanUp is a freemium WordPress plugin that allows you to remove CSS/JS per page and various other enhancements.
Summary
Unloading the entire plugin from a page/post is one of the many techniques used to improve the speed of your WordPress website.
The Plugin Load Filter is a lightweight plugin organizer that grants you complete control over your plugin’s loading behavior per-post/page basis. It enhances your core web vital score and provides an SEO advantage over bloated competitors.
You can utilize the Plugin Load Filter with caching plugins like WP Rocket or free speed-up plugins like Cache Enabler.
If you prefer not to use a caching plugin (which is my case), you can pair it with hosts that provide server-side caching, like Kinsta or Rocket. Alternatively, you can use it with your VPS hosting environment enhanced by Webinoly or CloudPanel.
We’d love to hear about your experience with plugin organizer plugins on your site. Please leave us a brief comment below to share your thoughts!

Anders
Hi,
Great post.
Question: Why are only some of my installed plugins listed in the Filter Registration page? I.e. it seem to only show around 10-12 plugins there but I have plugins not listed there which I want to remove from being used on specific pages.
Thanks, Anders
Shaikh Masood Alam
Thanks for the comment. I have never encountered these types of problems. I need to check it out.